Showing posts with label Recipes. Show all posts

Wednesday, February 6, 2013

Brownies You Don't Have to Share

Let's face it.  Going without refined sugar can feel lonely and oppressive when you live in a world where almost everything contains high-fructose corn syrup or white sugar.  I often find myself drooling over carrot cakes in the displays at coffee shops, or dejectedly turning down chocolate chip cookies from coworkers.  

I just need to remind myself that since going refined-sugar-free, I've discovered some wonderfully decadent desserts that also are quite nutritious.  Tasty treats I can feel good about.  

What's great about this kind of decadence is that people who eat a lot of sugar don't think my delicious desserts taste as good as their sugary, buttery options, so it gives me an excuse to not even try to share!  

And, strangely, sometimes these things are so rich and nutritious that I'm full before I can pig out on them the way I want.

Here's an example.  I found this recipe for "Raw Fudgy Brownies," and decided to make a couple of changes to suit the contents of my cupboards.  I didn't have macadamia nuts, and I didn't have time to soak the cashews for 2 hours.  So I tweaked things a little.  Because coconut oil can be pricey, I only used it in the ganache and left it out of the brownie.  


Raw Brownies

2 cup mixture of cashews and almonds, soaked for an hour or more (try other nuts if you like!)
3 dates, chopped
1 cup almond flour (I just ground almonds in the food processor until they were as fine as they'd get without becoming almond butter)
2 Tbsp chopped walnuts
1/2 cup cocoa powder (or more if you want stronger chocolate flavor)
2 Tbsp maple syrup

Ganache
2/3 cup cocoa powder
1/3 cup maple syrup
1/4 cup melted coconut oil
 
Soak almonds and cashews for an hour or more.  A few minutes before draining, add the dates to the water.  Strain and place in food processor, pulse until crumbly.

Add almond flour, cocoa powder and maple syrup and pulse until well mixed.  It will eventually become a little doughy, but will still be crumbly.  (Add melted coconut oil ~2 Tbsp or so ~ if you want it to be wetter.)

Dump the mixture into an 8x8 pan lined with wax / parchment paper and press down with back of spoon or with fingers.  

Blend the ganache ingredients in bowl until smooth.  Pour and spread over the brownies.  Chill in refrigerator for 10 to 30 minutes.  

Lift brownies out of pan using wax paper and place on a cutting board.  Cut with a large knife (to avoid sawing).  

Eat as many as you can, and don't worry about sharing with your sugar addict friends!

Saturday, December 22, 2012

Festive Smoothie

Back in the day, when I ate anything and everything, eggnog was one of those things that did me in this time of year.  I'm not a big fan of most Christmas traditions, but eggnog I could drink all year if you made me.


This isn't eggnog, but it's tasty and festive enough to pass in my book.  I found the recipe on one of my favorite sources for healthy, refined-sugar free recipes.  I only tweaked it a little bit, because I wanted to use kefir, and I didn't have all the spices on hand.  Here's what I got:

Gingerbread Smoothie

1 banana (frozen or not)
1 cup homemade kefir* (I bet homemade yogurt or any kind of milk would do, too)
1 Tbsp blackstrap molasses
1 tsp vanilla extract
1/2 tsp cinnamon
1/2 tsp ground ginger
1/4 tsp nutmeg

Throw it all in food processor or blender and blend til smooth.  

I actually found this to be a little sweeter than I wanted.  Maybe next time I'll cut down on the banana or molasses. 

*One of these days I will find time to post about the wondrous world of kefir. 

Saturday, December 1, 2012

Mint Chocolate Covered Patties

Today was a super painful day.  I had a bad night after my chiropractor appointment yesterday; kept waking up with a stiff / numb / sore arm and neck.  Then I overslept - which was so nice.  But oversleeping can destroy my back.  I usually live to regret that extra hour or so.  Today I slept in a full three hours!  So nice and cozy, but so dangerously bad for my day.

Before lunch I wrestled my snow tires (complete with rims) out of the basement of my landlord's barn and packed them into my car.  Later I scrubbed the bathroom floor and everything else.  The pain was really distracting and terrible, even as I sat and wrote a leisurely letter to a friend in Europe.  This idyllic snowy December day was kind of a nightmare.  

What's the solution to a nightmare day? 

Chocolate.  Dark chocolate.  


These tasty treats contain no refined sugars!  In fact, check out the short list of healthy ingredients: 

     The patties consist of: Dates, walnuts, cocoa powder, and coconut oil.
     The chocolate contains: Bakers Chocolate, coconut oil, maple syrup, and peppermint extract.

Yes, making these tiny nuggets of joy ruined my back even more.  But at least I was able to rest a couple of times, and at least my food processor made short work of some of the steps.  Find the recipe here.  (Her photography is much better than mine.)

So so yummy.

Thursday, November 15, 2012

Squash Puree


This is a laborious process, but I think it’s worthwhile, since it’s a great thing to do if you have any plans to do any baking that requires pumpkin or squash puree.  Rather than buy the canned stuff (which I admit requires far fewer steps), you can get yourself a few butternut squashes.

Cut the squashes (any winter squash, really) in half, take out the seeds, and bake – open side down – in the oven or microwave until tender.  Then scoop out the flesh.  After it cools a little, use the food processor to puree it until smooth. 

Freeze in small containers for later use.


Ok, you’re right, it’s a lot of work.  I’ll admit that doing this little project hurt my back a lot, and was probably not worth it.  But the squash was free, and I have a lot of plans to make pumpkinny recipes this winter.  

Sunday, November 4, 2012

Homemade Yogurt!

As I mentioned in my Granola post, I had a lot of stomach trouble when I lived in China, and yogurt and granola did a lot to help.  Over there, the yogurt I bought was very simple, plain, and not as falsely creamy as what you buy here in the States.  I found it really hard to adjust to eating American store bought yogurt when I got home.  In fact, I never did get used to it again, because I started making my own.

The extensive pile of ingredients; complicated, I know...

Look at the ingredients list on most of the yogurts you can buy at a supermarket, and compare it with my ingredients list below.  It’s kind of astounding how many additives a lot of store-bought yogurts contain.  You don’t need to eat all that.  True, homemade yogurt has a different flavor and texture, but you’ll find that you’ll grow to prefer it to all those sugars and thickeners and artificial flavors.  If you need to sweeten it, add honey and fruit or something.  Or, do like I do and eat it with granola, which goes perfectly with it.

My double boiler

Homemade Yogurt

This is a very simple process, don't be intimidated!

First think ahead about these things:

I find a double boiler system is the best way to avoid scalding the milk as I heat it.  I just use a large pot of water and put my 3 qt saucepan in it.  (A saucepan with a spout would be ideal, minimizing the amount of milk you lose when pouring it into the jars.  It took me a long time to finally cough up the money to buy a good spouted pan, but it's going to change my life, I can tell.)

It’s very tricky to do this without a thermometer; I recommend buying a meat thermometer so you can accurately measure the temperature of the milk as you heat and cool it.

You are going to need to keep the yogurt warm for several hours.  It needs to be kept at 90° to 100° for 4 to 8 hours.  Sometimes a low setting on the oven works – I have an oven thermometer and have marked my oven’s temperature dial at approximately 100°.  I have also used my microwave as a steam cabinet, placing the jars of yogurt in there with a couple of cups of boiling water.  With this method, you’ll have to reheat the water every 20 to 40 minutes, depending on the ambient temperature. (Unplug the microwave to avoid accidentally nuking the cultures!)  I generally do the microwave "steam cabinet method" in the summer, and use the oven in the winter.  I’ve also dreamed up a scheme to use a styrofoam box and a medical heating pad, but I haven’t gotten around to that yet.  And, I believe there are machines sold for this purpose, but I feel it’s more fun to be inventive!

Inside the microwave become "steam cabinet"

You’ll need some kind of heat resistant container with a good lid to make the yogurt in.  I find glass jars are perfect.  I use old pasta sauce and pickle jars, maybe about quart size.

Ingredients:

Milk *
             Yogurt containing live cultures **

            For the milk:  Choose your volume ~ what you use is approximately what you get.  I generally make a gallon at a time; it keeps well and usually lasts me 2 or 3 weeks.

For the yogurt:  A few tablespoons of plain yogurt** per large jar

Jars are ready for the warm milk

  *  I find whole milk works best and produces the thickest, creamiest result
**  I have found that Dannon’s Plain Yogurt works best.  With each subsequent batch of yogurt, I just use a few tablespoons from the previous batch.  The yogurt cultures need to be live to work.

Method:

In saucepan / double boiler, slowly bring milk to 180°.  (You'll have to stir frequently / constantly as you approach 180°.  I generally start paying close attention around 130°.)

Remove from heat and let cool to around 110°.  (I find this takes way too long if I just leave it on the counter, so I dump out the hot water from the bottom pot, refill it with cold water, and cool the pot of milk down.  It takes a couple of times, but it cuts out like 20 minutes of waiting.)

Pour into jars and add a couple of tablespoons of starter yogurt per jar, stir and seal.

Place in “incubation.”  Keep at 100° for 4 to 8 hours.  The longer it stays at 100°, the thicker and tangier it will be.  I once left mine for 12 hours by accident, and it was glorious!

My favorite breakfast!

I happen to think this yogurt is marvelous.  It’s also simple and healthy.  Pair it with the granola, use it in smoothies, or eat it by itself or with fruit.  It’ll change your life. 

Wednesday, October 31, 2012

Savory Zucchini Quick Bread


Oddly enough, I’m finding that it’s been hardest to find savory snack options that don’t contain refined sugars.  Sweet things are easy; you can use honey, molasses, maple syrup, or dates to sweeten a lot of things.  Dried fruit or a handful of nuts can be a great snack.  But when you’re craving something salty, your options are limited – especially if you’re trying to avoid salted nuts because you already eat too many nuts as it is.  Crackers, yeast breads, flat breads, etc, all can contain sugar. 

Desperate, I did a Google search for savory quick breads, and I found a few that really piqued my interest.  Among several really tasty looking options, I found this recipe for a savory summer squash bread.  It turned out to be ideal on a lot of levels.  Number one, there was no sugar in the recipe, so there was no need for substitutions.  Most of the ingredients are things I usually have on hand, and summer squash is generally easy to find.  I also found that this recipe could be tackled in clear steps, which was ideal.  I was in a crap-ton of pain the day I tried it, so I was able to pause a few times to rest on the floor before moving on to the next step.  (Oftentimes recipes are kind of time-sensitive, and you have to move efficiently through certain stages or everyone will die; those recipes tend to be stressful and painful for me, since I can’t stop and rest when I need to, and I end up pushing through till I’m half-delirious with pain.)

The original recipe called for only all-purpose flour, but I decided to use half all-purpose and half whole-wheat, because I’m a hippie wannabe but not experienced enough with whole-wheat flour to know if using it exclusively would ruin my life.

Three tasty savory mini-loaves.

I would warn you to be careful if you’re doing this in a single loaf pan.  I used three mini loaf pans, which makes me think that trying to use all the batter in one 9 x 5 pan would produce an ugly, bulging monstrosity.  The batter does rise a little bit, so use your brain skills. 

Savory Zucchini Quick Bread

¼ cup olive oil
1 cup all-purpose flour
1 cup whole wheat flour
¼ cup finely ground yellow cornmeal
2 tsp baking powder
1 ¼ tsp dried oregano
½ tsp salt (additional ¼ tsp for draining the squash, see note below)
½ tsp baking soda
½ tsp ground black pepper
2 eggs
¾ cups butter milk*
2 cups (about 1 pound) shredded zucchini / summer squash**
2/3 cups finely crumbled feta cheese

* It’s always annoying to have such small quantities of buttermilk in a recipe, because you usually have to buy it in bigger packages.  I just put a bottom-full of white vinegar in the measuring cup and fill the rest up with milk, thus making my own buttermilk.

Shredded squash waiting to be squeezed in cheesecloth

**Shredded zucchini can be very moist, so I used a cheesecloth to squeeze as much of the liquid out of it as I could.  I sprinkled some salt on it and let the shredded squash sit for a few minutes before squeezing it.  I also cut the salt quantity for the batter down from ¾ tsp to ½ tsp, because I added this extra salt to the zucchini to extricate some of the fluid.  


Method:

Mix dry ingredients and set aside.

Mix eggs, buttermilk and olive oil in a separate bowl; whisk until smooth.

Use a rubber spatula to fold in the shredded & drained zucchini and the feta cheese into the egg mixture. 

Pour the wet mixture into the dry mixture and stir / fold until the flour becomes incorporated.  Don’t over mix.

Dump the batter into oiled / sprayed loaf pan or mini loaf pans (or muffin tins!), leveling out the batter and flattening.  Bake at 350° until golden brown or until toothpick comes out clean.  (About 30 min for mini-loaves, 60 min for full loaf, much less for muffins...) 

As always, I froze most of mine for later.  This bread is delicious and makes a great snack – lightly toasted is amazing!  I bring it to work and toast it in the toaster oven for a tiny bit of time.

Saturday, October 20, 2012

Homemade Granola!

When I was living in Southwest China, I was sick like two-thirds of the time.  Between bacteria and spices, my stomach was almost always unhappy in some way.  Breakfasts of granola and yogurt turned out to be a small sort of savior.  I figured out how to make my own granola out of ingredients I could find in Chinese markets.  My oven was literally about nine inches wide, so instead of toasting the granola in the oven, I used a large wok (frying pan).  


After returning to the States, I had to tweak my “recipe” a little, but I have continued to enjoy this breakfast just about every day.  In fact, I love it so much, and eat it so often, that I sometimes get miffed when I have to meet someone for bagels or go to a diner for breakfast. 

I always used brown sugar and honey to make my granola.  But when I decided to give up refined sugars, I considered using molasses in some way.  Everything I read about molasses is positive – it’s high in nutrients, and is a great natural, raw sweetener.  Brown sugar is considered by many to be unrefined, but I thought I’d try my granola "molasses style" to see if I could make this tasty, healthy breakfast any tastier and healthier. 

 
Granola is very easily tweaked, so go nuts changing around the proportions and ingredients. 

Molasses Granola:

2/3 cup oil
2/3 cup molasses
1/3 cup honey
2 lb rolled oats
1 – 3 cups of various nuts, dried fruit, seeds to suit your fancy. 

(I like to use raw pumpkin seeds, raw sunflower seeds, and raw slivered almonds.  I avoid using dried fruit simply because I don’t like the chewiness mixed in with the crunchiness.  You can always add dried or fresh fruit when you eat it anyway.)

Put the oil, molasses and honey in a large frying pan / wok.  Heat on medium to high heat until it starts getting a little bubbly. 

Add oats and stir until coated.  Lower heat to the lowest possible.

Add nuts, seeds, etc, and continue to stir the mixture for about 20 – 30 minutes.  It’s important to keep the granola moving in the pan to allow everything equal access to the heat and to avoid burning.  This is tedious.  The closer you get to 30 minutes, the toastier and crispier your granola will be.  (I usually quit after 20 to 25 minutes, because this is a super painful process for my back.)

Remove from heat and let cool – stirring every 5 or 10 minutes so it doesn’t all harden together.  Transfer into pretty airtight containers (glass jars, zipper bags, or a resealable container).  All of the ingredients have a long shelf life, so this stuff keeps for a long time. 

Serve with milk or yogurt.  (I like to eat mine with my homemade yogurt which is quite tangy and goes really well with the sweetness of the granola.)


Non-Molasses Version:

My original recipe contained

2/3 cup oil
1/2 cup honey
1/2 cup brown sugar
2 lb oats
1 – 3 cups of various nuts, dried fruit, and/or seeds. 

Monday, October 15, 2012

Banana – Sweet Potato – Chocolate Pudding


Ever have one of those days when you arrive home after a painful and exhausting day at work with little energy to fix a meal and only a random assortment of foods in the fridge?  Well, it happens to me all the time.  But for once, I resisted the temptation to find take-out on the way home, and I improvised with the contents of my fridge.

For dinner I had boiled eggs.  I figured it would be easier to clean up afterwards if I cooked them in their shells. 

“Dessert” was really part of the meal.  It was sweet, for sure, but you can’t shake your head disapprovingly at these nutrient rich ingredients.  I had a baked sweet potato, some bananas, and a cupboard full of baking necessities.  Here’s what I did:

Banana – Sweet Potato – Chocolate Pudding:

1 baked sweet potato – peeled and diced.
1 (or more) banana
a tiny bit of milk
4 Tbs cocoa powder

I whipped everything together in the food processor, added the cocoa powder toward the end, and waited till it gave me a nice pudding-like consistency. 


Who says you can’t have dessert for supper?

Monday, October 8, 2012

Ginger Honey Tea: The Beverage that Bites Back

I caught a cold from my germ-bag nephew, who rarely fails to pass on some kind of bug to me during our visits.  It was a perfect opportunity to pamper myself with orange juice, chicken soup, and one of my favorite things in the universe:  Ginger Tea.

I’ve actually never made this from scratch before.  When I lived in Southwest China, there was a restaurant that would brew up a pot for a few dollars.  At some point, I found a crystallized mix that worked rather well, but it was very sugary and left an uncomfortable sensation on my teeth.  So, this week, I decided to try to make of this glorious beverage from fresh ginger. 


Here’s how I did it; I bet you could play with the proportions quite a bit.

Ginger Honey Tea

1 – 2 fresh ginger roots; shredded, or finely chopped.
4 to 6 cups water
Honey

In medium saucepan, bring the water to a rapid boil and add the chopped ginger.  Return to boil before turning the heat off.  Let it sit and steep for a while.  I let it steep for 10 or 15 minutes. 

Pour into glass jars or teapot, being careful to strain out the chunks of ginger.  Add as much honey as you want, aiming for the desired sweetness.  I think I ended up using like 10 teaspoons.  It might take a lot. 

You can now drink as much as you like, or save it for later in the fridge.  You may find it packs more punch than you like, so feel free to add water to tone it down.  You can also add some hot milk to make a sort of Ginger Latte.  Lemon may go really well with it too.  The sky is the limit.  Play around with as many options as you want.

Sunday, September 30, 2012

Ricotta Pesto Pasta

It's good to have stuff on hand that I can prepare quickly when I get home from work.  I decided to make some cheesy-pesto "sauce" for pasta, and put it in the freezer in small baggies.  All I have to do is think ahead enough to defrost them before dinner, and I can cook up the pasta to have with it.  The finished product of this could use a little more salt, and possibly a sprinkling of freshly grated Parmesan.  I encourage you to play with this sauce and make it better.  If you come up with something awesome, let me know. 

I am an idiot, and I got mixed up, and I labeled these as "Pesto-Risotto" sauces.  Not risotto, ricotta

Ricotta Pesto

1 cup prepared pesto
4 cups Ricotta (fat-free or not, whatever you want)
1/2 cup grated Parmesan cheese
Salt and pepper to taste
* Warm water from pasta (just enough to make the cheese mixture a saucy consistency; add this when you're serving it, not before you freeze the baggies.  It'll heat up the cheese mixture a little, and give it a saucy consistency.)


Mix the ingredients in a bowl.  Divide into freezer packages, or use it all at once.  Save some of the pasta water from cooking your pasta and add a small amount to the cheese mixture to get to a consistency that seems right to you.  Add hot, drained pasta to the mix and stir it up. 


Add salt and freshly grated Parmesan if you like, and let me know if you perfect this!


Monday, September 17, 2012

Butternut-Apple Soup


Well, folks, it's Autumn, so it's time to endure the bittersweet wonderfulness of Fall vegetables.  Don't get me wrong, I love Fall veggies.  They just tend to take more energy to prepare, and as you may have noticed, preparing food is agony for me.  Even with my new, fancy Wusthof knife, cutting up the butternut squash for this recipe took forever, and killed. 


A somewhat wise friend once told me that pain has a short memory.  She was right.  A few weeks ago I endured the debilitating torture of cooking and pureeing a tasty Creamy Tomato Soup.  When I finally finished up and curled up in a ball on the floor, I made a mental note not to undertake such big projects again - unless my back improves.  But here I am, reeling from another toilsome afternoon in the kitchen, with the acidy-burny sensation in my back reminding me that I should aspire to smaller tasks.


Anyway, here's the recipe.  I handled this in much the same way as I did the tomato soup, I even froze it in ziplock bags, flat on the freezer floor. 

Butternut-Apple Soup

1 to 3 tsp olive oil
1 large onion, chopped
1 to 3 cloves garlic, minced 
25 to 32 oz. chicken broth
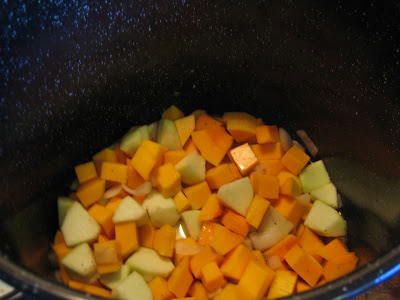
2 butternut squashes (about 5 lbs total), peeled and chopped into 1-inch cubes
2 granny smith apples, peeled and chopped into 1-inch cubes
1 to 2 tsp salt
1/2 to 1 tsp black pepper

In large pot, heat oil.  Add onions, cook until softened.  Add garlic, cook for about a minute.  Add broth, squash, apples, salt and pepper.  Bring to boil, lower to simmer, cook until tender.  Let cool for 5 to 20 minutes before beginning to puree in small batches in food processor. 

At this point, you can either let it cool before dividing into freezer packages, or you can transfer it back into the pot to heat it up to serve. 


Thursday, September 13, 2012

Creamy Tomato Basil Soup


This turned out to be a bigger ordeal than I bargained for.  But I think the results will be appreciated – by me – in the weeks to come, since I ended up with enough tomato soup to last me 12 to 15 meals. 

If I keep up with this blog for any real length of time, and if you read many of it’s entries, you will find me repeating this bit of wisdom gleaned from years living alone with chronic pain: Cook large batches of food that can be frozen in one or two serving size containers, and you will thank yourself on those days when you don’t have the energy to fix a meal. 

Many weekends, I devote a big chunk of at least one afternoon to fixing an enormous quantity of some dish that is freezable.  In doing so, I concentrate all the pain and torment of cooking into a few hours, and disperse the food and enjoyment over several weeks. 


I found a recipe similar to this in a cookbook given to me by a friend.  I made a double batch and a few changes.  Because the second-to-final stage involves whisking cold milk into the soup, I was able to quickly transfer the end product into freezer bags and throw it in the freezer without waiting for it to cool.

You'll notice that my measurements are pretty arbitrary, I tend to tweak recipes as I go based on how much of each ingredient I have on hand and how much energy I feel I have for all the preparations.  For example, I put quite a bit more basil in this than the original recipe called for, mainly because I had a pretty hefty bunch of basil to use up and didn't want to waste it.  

Here’s the recipe:

2 – 5 tbsp olive oil.
1 – 3 onions.
2 – 5 garlic cloves minced. 
8 -12 large, ripe tomatoes; peeled and diced.
2 – 3 cups chicken broth.
4 -6 tbsp fresh basil leaves.
6 cups milk (I like to use whole or 2%, fat makes food taste good).
6 oz can tomato paste.
Salt and black pepper to taste. 

Heat oil in large sauce pan / stew pot.  Cook onions until softened.  Add tomatoes, broth, garlic, and about ½ tsp salt and ¼ tsp black pepper.  Bring to boil, then lower to simmer for about 10 minutes, or until everything is tender. 


Puree in small batches with basil leaves.  (You could also save the basil leaves till the very end, adding them [finely chopped] as you’re warming up the soup to serve it.)


When entire batch is pureed, transfer back to pot, adding tomato paste and milk.  Now would be a good time to taste it and see if it needs more salt and pepper. 

Now you can either transfer the soup to containers for freezing, or warm it up to serve it.  When warming it up, be sure to avoid boiling it.  Because it contains milk, it will get that gross film on top if it gets too hot.

I froze this soup in zip-lock bags, flat on the freezer floor.  Once the bags freeze, you can move them around in the freezer.  Because they end up thin and rectangular, it can be really convenient. 


I also made sure to label the bags.  In addition to the name of the dish, I like to write instructions to myself on how to serve the food.  In this case, the soup is ready to eat.  I just need to thaw and heat it.  Sometimes I’ll write something like, “Serve with pasta,” or “add carrots.”  

If I'd thought ahead, I would have labeled the bags before I filled them.  My handwriting was much messier than usual because I wrote on a bag filled with liquid!